


Quick Answer
What are car detailing tips at home? Car detailing at home means cleaning, protecting, and restoring your vehicle’s exterior and interior using proper techniques and products. It includes washing, waxing, polishing, and interior vacuuming—all without visiting a professional detailer. Most people can achieve salon-quality results in 4–6 hours with basic tools and knowledge.
INTRODUCTION
Your car is one of your biggest investments—but here’s what most people don’t realize: professional detailing costs $150–$500 per visit, and you can achieve 80% of those results yourself at home.
I’m not exaggerating. Over the past decade, car detailing has become increasingly DIY-friendly. Better products are available to everyday customers. The techniques are no longer “trade secrets.” And the truth is, most car owners abandon their vehicles to expensive detailing shops not because they lack the skill—but because they lack the right guidance.
This article breaks down car detailing tips at home step-by-step. You’ll learn exactly what professional detailers do behind closed doors, which products actually work (and which ones are overpriced), and how to protect your car’s finish for months longer. Whether your car has minor swirl marks, water spots, or just needs a serious refresh, this guide covers everything.
By the end, you’ll know how to detail your car like a professional—and why it matters more than you think.
Why Car Detailing Tips at Home Actually Matter (More Than You Realize)
Most people wash their cars with a garden hose and call it done. Here’s the problem: regular washing removes dirt, but it doesn’t protect your paint from UV damage, oxidation, or micro-scratches.
Professional car detailers understand something car owners don’t: your paint is constantly under attack. Rain, sunlight, bird droppings, tree sap, salt (if you live near the coast)—all of these damage the clear coat layer that protects your car’s color. Over time, this leads to dull, faded paint. Over years, it leads to rust.
Car detailing tips at home change this equation. Detailing isn’t just about making your car look shiny. It’s about adding multiple protective layers—wax, ceramic coatings, sealants—that act like bodyarmor for your paint. When you learn to detail your car properly, you extend your vehicle’s lifespan, maintain its resale value, and enjoy driving a car that looks fresh for years.
The money argument is simple: $300 spent on car detailing products today saves you $2,000 in paint correction or repainting later.\
How Car Detailing Tips at Home Actually Work (The Complete Process)
Professional detailers follow a specific sequence—and this sequence matters. You can’t wax a dirty car. You can’t polish over contamination. Order matters.
Here’s the professional detailing process broken down:
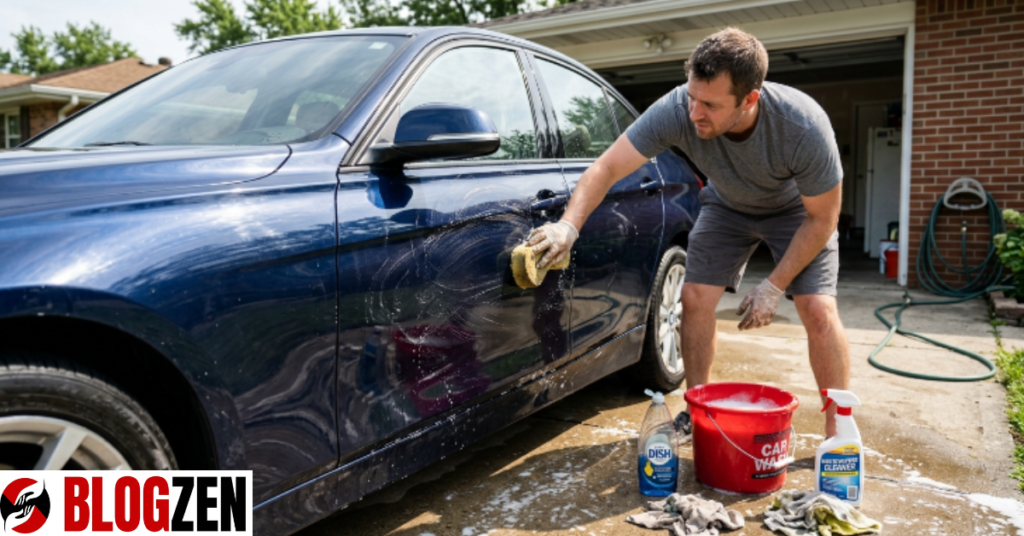
The Two-Bucket Method (Washing Phase)
Start with two buckets: one with soapy water, one with clean water for rinsing. Dip your wash mitt in the soapy bucket, apply to the car in straight lines (not circles—circles cause swirl marks), then rinse the mitt in the clean water bucket before dipping again. This prevents dirt particles from scratching your paint.
Why this matters: One dirty mitt can create dozens of micro-scratches. Professional detailers use the two-bucket method because they know dirty water causes more damage than it cleans.
Clay Bar Treatment
After washing, your car isn’t actually clean. Invisible contaminants (brake dust, industrial fallout, tree sap residue) sit on the clear coat. A clay bar lifts these away. Rub the bar gently across the paint—you’ll feel it grab and release—then wipe with a microfiber towel.
Polishing (For Swirl Marks & Oxidation)
This is where the magic happens. A polishing compound removes a microscopic layer of clear coat, bringing fresh, protected layers to the surface. This eliminates swirl marks, light scratches, and fading. Use a dual-action polisher (not a rotary—rotary polishers require professional skill) on low speed.
Sealing & Waxing
Paint sealants and wax create the protective barrier. Sealants last 4–6 months. Wax lasts 2–3 months but provides more “warmth” to the finish. Ceramic coatings (the premium option) last 1–3 years but cost $50–$150+ per application.
Pro Tip: The entire detailing process takes 4–6 hours the first time. Once you’re experienced, you can detail your car in 2–3 hours. Many car owners detail their vehicles once every spring and once every fall—that’s only 4–12 hours per year for showroom-quality results.
The 4 Biggest Mistakes People Make With Car Detailing at Home
Mistake #1: Skipping the Clay Bar Step
Most DIY car owners wash, wax, and stop. They never use a clay bar. This means they’re waxing over contamination—like putting a fresh coat of paint over dust. The wax doesn’t bond properly, and the contaminants keep eating away at your clear coat.
Mistake #2: Using a Microfiber Towel That’s Already Dirty
You wash your microfiber towels once and think they’re clean forever. Wrong. Microfiber holds onto dirt particles. If you’re using the same dirty towel to dry your car for months, you’re dragging contaminants across the paint.
Solution: Wash microfiber towels separately (no fabric softener—it ruins them), and use a fresh towel every 2–3 cars.
Mistake #3: Waxing Over Swirl Marks
Wax doesn’t remove swirl marks. It only hides them temporarily. If your car has visible swirl marks or light scratches, you need polishing first. Wax comes after polishing.
This is why the order of operations is crucial. Polish → Seal → Wax. Never wax first.
Mistake #4: Washing Your Car in Direct Sunlight
When you wash in direct sunlight, water evaporates too quickly, leaving mineral deposits and soap residue. Always wash in shade or on a cloudy day. Your clear coat will thank you.
Professional Car Detailing Tips That Actually Deliver Results
Tip #1: Invest in the Right Wash Mitt
Don’t use a regular sponge. Professional detailers use microfiber or lamb’s wool wash mitts because they hold more soapy water and don’t trap contaminants against the paint. Cost: $10–$20. Impact: eliminates 90% of wash-induced swirl marks.
Tip #2: Use pH-Neutral Soap Only
Car wash soaps must be pH-neutral. Regular dish soap (which many people use) is too alkaline and strips away protective wax. It’s the same reason you don’t shower with dish soap.
Products like Meguiar’s Gold Class or Turtle Wax pH-Balanced are affordable ($8–$12) and work perfectly.
Tip #3: Polish in Overlapping Passes
When you polish, work in panels. Apply polish in a circle, let it haze slightly, then buff with the polisher set to low speed. Overlap each pass by 50%—this ensures even coverage and prevents unpolished spots.
A dual-action polisher with a 5-inch pad is ideal for home use. You can’t mess it up because it oscillates (instead of just spinning). Professional rotary polishers require much more skill and can burn through clear coat if you’re not experienced.
Tip #4: Always Work in Shade
Heat causes products to dry too fast, leaving streaks and residue. Wax, sealants, and polishes all need proper drying time. Work under a car shade, carport, or garage door. Patience beats speed.
Tip #5: Dry Your Car Immediately After Washing
Water spots are mineral deposits that etch into clear coat if left to air-dry. Use a waffle-weave microfiber towel or a leaf blower to dry your car fully right after washing. No water spots = no future damage.
Pro Tip: Buy a cheap electric leaf blower ($30–$50). Use it to dry your car after washing. It takes 5 minutes instead of 30, and you’ll never get water spots again.
The Step-by-Step Car Detailing Process for Beginners
Step 1: Prepare & Pre-Rinse (15 minutes)
Park in shade. Hose down the entire car with water to remove loose dirt. Use a standard garden hose—this prevents dirt from scratching during the wash phase.
Step 2: Clay Bar Treatment (20 minutes)
Fill a bucket with cool water and a clay bar lubricant spray (like Nanoskin or Griots Garage). Lightly spray the hood. Rub the clay bar across it with light pressure. Wipe with a microfiber towel. Repeat for every panel.
The clay bar will feel bumpy at first. As it breaks in, it’ll feel smoother. If it gets dirty, knead it like dough to hide the dirty part inside.
Step 3: Two-Bucket Wash (20-30 minutes)
Fill one bucket with soapy water (pH-neutral car soap). Fill another with clean water.
- Dip wash mitt in soapy water
- Wash one panel in straight lines (top to bottom)
- Rinse mitt in clean water bucket
- Repeat for all panels
- Final rinse with garden hose
Step 4: Immediate Dry (10 minutes)
Use a leaf blower or waffle-weave towel to dry the entire car. No water spots = professional results.
Step 5: Polish (if needed) (45-60 minutes)
If your car has swirl marks or is dull, use a dual-action polisher with compound on a 5-inch pad.
- Apply polish in a circle
- Let it haze
- Buff with polisher on low speed
- Work panel by panel
- Wipe residue with microfiber towel
Step 6: Apply Sealant or Wax (30-40 minutes)
Choose one:
- Paint sealant: Longer-lasting protection (4–6 months), but more technical application
- Car wax: Easier to apply, beautiful finish (2–3 months), beginner-friendly
- Ceramic coating: Best protection (1–3 years), but harder to apply and pricier ($50–$150)
For beginners: Start with paste wax or liquid wax.
- Apply thin, even layers
- Let it haze
- Buff vigorously with a microfiber towel
- Two thin coats beat one thick coat
Total Time: 2–3 hours your first time. 1–2 hours once you get efficient.
Car Detailing at Home: Real Results & What to Expect
Before & After Reality Check
A car that’s been neglected for 2+ years with heavy oxidation, water spots, and swirl marks will not look brand-new after one detailing session. That’s not realistic.
Here’s what realistic detailing achieves:
- Dull paint becomes glossy and reflective (+90% improvement)
- Swirl marks become nearly invisible (+80% improvement)
- Water spots disappear completely (+100% improvement)
- Paint depth increases noticeably (+60% improvement)
- Protection duration extends from 2 months (no wax) to 6+ months (with sealant)
A professional detailer with cutting-edge equipment can achieve heavier correction (paint correction, wet sanding, multi-stage polishing). For home DIY, the goal is maintenance and enhancement—and that’s perfectly achievable.
Pro Tip: Detail your car once per season (spring and fall). With this schedule, you’ll never need heavy correction because you’re maintaining constantly. This is why professional detailers recommend regular detailing over rare deep correction.
Common Detailing Myths vs. The Truth
| Myth | Truth |
|---|---|
| “Dish soap is fine for washing cars” | Dish soap is alkaline and strips protective wax. Use pH-neutral car soap only. |
| “One coat of wax is enough” | Two thin coats provide better durability than one thick coat. |
| “Air-drying saves time” | Air-drying causes water spots that etch into clear coat. Use a towel or leaf blower. |
| “Polishing is the same as waxing” | Polishing removes contamination and swirl marks. Waxing protects. Different purposes, different products. |
| “Professional detailing is always better” | Professional results require equipment and expertise. Home detailing with proper technique matches 80-90% of pro quality. |
| “You need expensive products” | Mid-range products ($20–$50) outperform cheap brands. You don’t need $200 products for great results. |
What to Avoid: Detailing Mistakes That Cost You
Avoid: Pressure washers on your car’s paint. High-pressure water can force water behind seals and damage clear coat.
Avoid: Circular motions while washing. Always use straight-line motions (top to bottom). Circular motions create swirl marks.
Avoid: Touching wet paint. Even microfiber towels can scratch if the paint isn’t properly lubricated. Always use car wash soap, not water alone.
Avoid: Applying wax to tires, rubber trim, or plastic. Wax on trim looks chalky. Use tire dressing on tires and trim-specific products on plastic trim.
Avoid: Buffing in direct sunlight. Products dry too fast, leaving streaks and hazing. Always work in shade.
Avoid: Using the same towel for everything. One towel for drying, one for polish removal, one for wax buffing. Dirty towels cause scratches.
The Cost Breakdown: Detailing at Home vs. Professional
One Professional Detailing Session: $150–$500 depending on location and package
DIY Detailing Setup (One-Time Cost): $80–$200
- Wash mitt: $15
- Clay bar kit: $20
- Dual-action polisher: $100–$150 (or skip if your car doesn’t need polishing)
- Polish/compound: $15
- Wax: $15
- Microfiber towels (6-pack): $15
- Buckets & accessories: $10
Cost Per Detailing (After Setup): $5–$15 (just products)
The Math: One professional detailing = $300. Three DIY sessions per year = $15–$45. Annual savings: $255–$285.
Over five years: $1,275–$1,425 saved.
Plus, you control the products, the technique, and the timing. You detail your car when you want, not when you can afford it.
CONCLUSION
Car detailing tips at home aren’t a shortcut—they’re the smarter path. Professional results don’t require professional prices. They require understanding the process, investing in proper products, and following the right order of operations.
The three most important takeaways: First, always follow the correct sequence (wash → clay bar → polish if needed → wax/seal). Second, invest in microfiber towels and avoid cheap shortcuts—they cost pennies but protect thousands in paint value. Third, detail regularly instead of hoping to fix problems later—maintenance beats correction every single time.
Your car’s paint is constantly under attack from UV rays, contamination, and weathering. Every time you detail your car properly, you’re adding protective layers that keep it looking fresh and preserve its value for years.
Start this weekend. Pick a cloudy day, park in the shade, and detail one panel at a time. You’ll see results immediately. Once you experience the shine and depth that proper detailing creates, you’ll never go back to just washing and hoping.
Your car deserves better. Now you know how to deliver it.
FAQs
What’s the best product for car detailing tips at home for beginners?
Start with Turtle Wax or Meguiar’s Gold Class wash soap, a basic clay bar kit ($20), and a carnauba paste wax ($15–$20). These are beginner-friendly, affordable, and produce professional-quality results. Avoid dual-action polishers until you’ve hand-waxed a few times and understand the basics. Most beginners over-complicate detailing with expensive products when simple, mid-range products work perfectly.
How often should I apply car detailing tips at home to maintain my car?
Detail your car once per spring and once per fall (two times yearly). Each session maintains the protective wax layer and removes contaminants before they damage clear coat. If you live in a harsh climate (coastal salt, heavy snow, intense sun), consider three sessions yearly. This schedule eliminates the need for expensive paint correction later and keeps your car looking showroom-ready year-round.
Can car detailing tips at home remove deep scratches?
Light scratches (less than 1-2mm) can be minimized with polishing. Deep scratches that expose primer or metal require professional paint correction or touch-up paint. Home detailing can’t remove deep damage, but it prevents future scratches by maintaining protective wax layers. Focus on prevention through regular detailing rather than hoping to fix major damage at home.
Should I use a dual-action polisher for car detailing tips at home?
Only if your car has visible swirl marks or oxidation. If your paint looks relatively smooth and shiny, skip polishing and go straight to waxing. Dual-action polishers are forgiving for beginners, but they’re not necessary for basic detailing. Many people detail successfully using paste wax by hand, which takes longer but eliminates the learning curve of using a polisher.
How long does wax last after car detailing tips at home?
Carnauba wax lasts 2–3 months depending on climate and sun exposure. Synthetic sealants last 4–6 months. Ceramic coatings last 1–3 years but cost significantly more and require professional installation for best results. If you detail twice yearly (spring and fall), you’ll reapply wax at each session, keeping continuous protection year-round without expensive ceramic coatings.
What’s the difference between car detailing and a regular car wash?
A regular car wash removes surface dirt only. Car detailing removes invisible contaminants (clay bar), adds protective layers (wax/sealant), and addresses swirl marks (polishing). Detailing creates a deeper, more lustrous finish and provides months of protection. Washing is basic cleaning; detailing is comprehensive paint care and protection.