

QUICK ANSWER
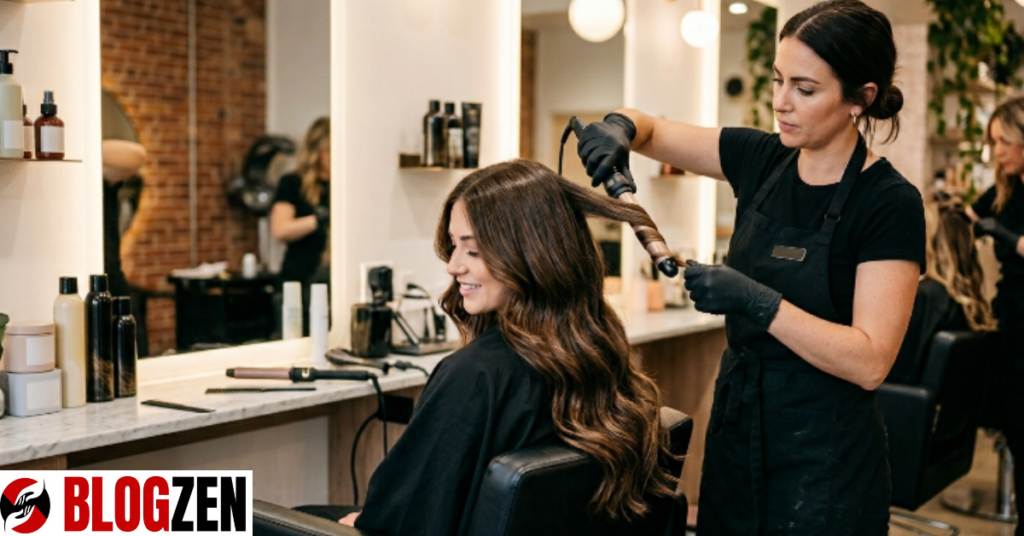
U shape long layers with soft mermaid waves combine a curved U-cut at the back with face-framing layers throughout, finished with loose, flowing waves that mimic the texture of a mermaid’s hair. The result is maximum movement, volume, and a lived-in, coastal look that works on almost every hair type. It takes roughly 90 minutes in a salon and stays gorgeous for 10–14 weeks.
Your hair can look completely different depending on one thing: the shape of the cut underneath. Most women with long hair get a basic straight cut across the back and wonder why their waves never look as full or as effortless as what they see online. The answer is almost always the U shape — and the layers that go with it.
U shape long layers with soft mermaid waves are not just a trend. They are a structural decision that changes how your hair moves, how waves form, and how long your style actually lasts between washes. Once you understand how this combination works, you will never look at a basic blunt cut the same way.
This article breaks down exactly what this hairstyle is, how to ask for it correctly, what mistakes to avoid, and how to recreate the waves at home — step by step.
What Are U Shape Long Layers with Soft Mermaid Waves, and Why Is Everyone Getting This Cut Right Now?
Here’s what most people do not realize: the U shape is not just decorative. It is an architectural choice that determines how your layers fall and how waves form naturally through the length of your hair. A U-shaped cut means the back of your hair is cut into a gentle curve — the center hangs slightly longer than the sides — creating a soft, rounded hemline when the hair falls naturally.
Pair that base with long layers cut throughout the mid-lengths and ends, and you immediately add movement and reduce weight. The layers are not short or choppy — they are long, flowing sections that blend seamlessly. And when you finish with soft mermaid waves (think: loose, S-shaped, natural-looking curls with no tight spirals), the whole look comes alive.
Right now, this cut is dominating Pinterest boards and salon request lists because it sits perfectly between polished and undone. It is glamorous enough for a wedding but relaxed enough for a beach day. According to Google Trends data, searches for mermaid wave hairstyles have grown over 65% in the past two years — and the U-shape variation specifically has become the most-requested version of this look.
The bottom line: this is not just a pretty hairstyle. It is a smart structural cut designed to make long hair look its absolute best.
How the U Shape Cut Actually Creates Better Waves (Most Stylists Skip This Explanation)
Let me explain why this matters — because once you understand the mechanics, you will never settle for a flat, lifeless blowout again.
When your hair is cut in a straight line across the back (a blunt cut), the weight distributes evenly and actually pulls waves down. The sheer mass of all that hair at the same length creates tension that fights natural movement. Your waves flatten within hours — sometimes within minutes in humidity.
The U shape changes the weight distribution entirely. Because the center back is slightly longer and the sides curve up gradually, the hair at the sides and front naturally wants to move forward and inward. When you add long layers into this framework, each section of hair has a different length and a different amount of weight — which means waves set differently throughout the head and create that dimensional, multi-textured look that makes mermaid waves so stunning.
Think of it this way: a flat piece of fabric draped over a chair looks dull. But a fabric cut with curves and varying lengths? It drapes, flows, and catches light in completely different ways. Your hair works exactly the same.
Pro Tip: Ask your stylist to cut your U shape so that the center point sits no more than 2–3 inches longer than your shortest side section. A deeper U can look dramatic but tends to tangle more and makes the mermaid waves look uneven.
The 5 Most Common Mistakes People Make with This Style (And How to Fix Them)
Most people who try this look at home — or even in a salon — run into the same five problems. Here is what goes wrong and how to correct it.
Mistake #1: Asking for “beach waves” instead of “mermaid waves.” These two terms sound similar but they are not the same thing. Beach waves tend to be smaller, tighter, and more uniform. Mermaid waves are larger, softer, more elongated S-shapes. When you use the wrong term, you often leave the salon with something completely different from what you pictured.
Mistake #2: Skipping heat protectant. Mermaid waves require heat — usually a large-barrel curling wand (1.5 to 2 inches) or a flat iron. Without protectant, you are cooking your layers every single time. A damaged layer does not hold a wave; it frizzes. Use a spray protectant rated for at least 450°F, every time, no exceptions.
Mistake #3: Curling all sections in the same direction. Here is what nobody tells you: for true mermaid waves, you need to alternate the direction of each curl. One section curls toward your face, the next curls away. This alternating pattern is what creates that loose, flowing S-shape instead of a tight ringlet spiral.
Mistake #4: Getting layers that are too short. Long layers should start no higher than your collarbone. Anything shorter starts to look shaggy, and it fights the U shape at the back instead of complementing it. Always be specific: “long layers, starting at my collarbone, blending to my ends.”
Mistake #5: Brushing waves right after curling. Wait until waves are fully cool. Separate them only with your fingers — never a brush or comb while they are still warm. Most people lose half their wave definition by brushing too early.
Expert Tips for Getting Perfect Soft Mermaid Waves Every Time
Professional stylists who specialize in long-hair work all agree on a few non-negotiable techniques. These are not general tips — they are the specific things that separate a great result from a mediocre one.
Use a texturizing spray before you curl, not after. Most people spritz product on at the end as a finishing touch. But applying a lightweight sea salt or texturizing spray to dry hair before you pick up the wand creates a slightly rough surface that actually helps the wave grip and hold its shape far longer. Apply it to mid-lengths and ends only — never the roots, or you will lose volume at the crown.
Section your hair into at least 6 parts. The biggest mistake with at-home mermaid waves is taking sections that are too large. Large sections = large, sloppy waves that fall out in 30 minutes. Divide your hair into six sections minimum (two at the nape, two at the mid-head, two at the crown) and curl smaller sub-sections within each. Yes, it takes longer. The result lasts two to three times as long.
Let the U shape do some of the work. Because your back layers naturally curve and fall forward, the bottom sections of your hair are actually the easiest to wave. Start curling at the back layers, work your way up, and finish with the top section. By the time you reach the crown, the bottom waves have cooled and set, giving you a solid base to work from.
Pro Tip: Apply a tiny amount of argan or camellia oil to your palms and gently scrunch the waves while they are still slightly warm — this smooths the frizz, adds shine, and sets the shape without stiffening it like a hairspray.
Real-World Comparison: U Shape vs. Other Long Haircuts for Mermaid Waves
Understanding how the U shape stacks up against other cuts helps you make an informed choice at the salon.
| Cut Style | Wave Hold | Volume | Face Framing | Best For |
|---|---|---|---|---|
| U Shape + Long Layers | Excellent | High | Natural | Mermaid waves, beachy styles |
| Blunt Cut (No Layers) | Poor | Low | Minimal | Sleek, straight styles |
| V Shape + Layers | Good | Medium | Strong | Dramatic, bohemian looks |
| Shag Cut | Good | Very High | Aggressive | Textured, edgy styles |
| Straight Cut + Curtain Bangs | Fair | Medium | Heavy at front | Classic, polished looks |
The U shape wins specifically for mermaid waves because it distributes weight in a way that actively supports how waves form and fall. The V shape comes close, but the pointed center back can make waves look uneven at the ends. A blunt cut simply fights the process at every step.
Step-by-Step: How to Style U Shape Long Layers with Soft Mermaid Waves at Home
This is the process that actually works — not a simplified version. Follow each step and you will get results that look salon-fresh.
What you need:
- Large-barrel curling wand (1.5–2 inch)
- Heat protectant spray
- Texturizing or sea salt spray
- Argan oil or light hair serum
- Clips to section hair
- A fine-toothed tail comb for parting
Step 1: Start with completely dry, clean hair. Damp hair will not hold a wave. If you washed today, blow dry first and let it cool for 10 minutes before touching it with any hot tool.
Step 2: Apply texturizing spray to mid-lengths and ends. Let it dry for 2 minutes. This is your grip layer.
Step 3: Apply heat protectant throughout, root to tip. Do not skip this. Let it dry.
Step 4: Section your hair into 6 parts. Use clips to keep sections out of the way.
Step 5: Start at the nape section. Take a 1-inch sub-section. Wrap it around the wand barrel, holding for 8–10 seconds. Release and let it cool in your palm for a moment before letting it fall.
Step 6: Alternate curl direction on every section. Toward face, away from face, toward face — alternate consistently.
Step 7: Work upward through each section. Do not rush. Each curl should be set before you move to adjacent sections.
Step 8: Once all curls are done and fully cool, run your fingers through them — loosely, from the top down. Separate into waves, not individual curls.
Step 9: Apply a tiny amount of oil to your palms and scrunch gently. Finish with a light-hold flexible hairspray, held 12 inches from the head.
Step 10: Let the U shape work. Tilt your head forward and shake slightly — the U-cut layers will naturally fall forward and frame your face, completing the mermaid effect.
Pro Tip: Sleep with your waves in a loose, low bun secured with a silk scrunchie. You will wake up with second-day waves that honestly look better than day one — slightly looser, more natural, perfectly effortless.
Mermaid Waves Myths vs. Facts: What You’ve Been Told That Simply Isn’t True
The internet is full of confident advice about this hairstyle that is just plain wrong. Let’s clear the record.
Myth: “You need thick hair for this look to work.” Fact: This is one of the most forgiving cuts for fine to medium hair. The layers actually remove weight and create the illusion of fuller hair. Fine-haired people often get better results with this cut than those with thick hair, because each layer waves independently without the competing weight of a dense, heavy hemline.
Myth: “Mermaid waves only look good on very long hair.” Fact: The U shape with long layers works beautifully on hair that reaches just past the shoulder (roughly 14 inches and beyond). You do not need waist-length hair. In fact, very long hair (30+ inches) can sometimes look too heavy for the style unless the layers are cut quite aggressively.
Myth: “You have to use a curling wand — flat irons don’t work.” Fact: A flat iron can create beautiful mermaid waves, and many professionals prefer it for the smoother, more elongated S-shape it produces. The technique is different (you twist and pull the iron as you glide down the section) but the result is arguably more authentic to the mermaid wave aesthetic.
Myth: “This style requires a lot of maintenance.” Fact: The U shape with long layers is actually one of the lower-maintenance long haircuts available. Because there is no blunt line to maintain, slight grow-out (even 8–10 weeks) looks intentional rather than neglected. The layers soften as they grow, which often makes the waves look even better at week 8 than they did at week 2.
Conclusion: Your Next Step Toward the Hair You Actually Want
Three things matter most here. First, the U shape is not optional if you want mermaid waves that actually hold — it is the structural foundation that makes the style work. Second, your layers must start at the collarbone or lower and blend seamlessly to the ends. And third, the wave technique (alternating direction, proper sectioning, cooling before separating) is what transforms a good haircut into a genuinely stunning one.
Do not walk into a salon and just ask for “mermaid waves.” Walk in with a clear picture of the U shape, a reference photo of the wave texture you want, and the specific language: long layers from the collarbone, U-shape at the back, soft S-wave finish.
What’s your hair type — fine, medium, or thick? Drop it in the comments below and I’ll tell you exactly how to adapt this technique for your specific texture. And if you’re ready to take the next step, check out our guide on the best curling wands for long layered hair — the tool matters more than most people think.
Your best hair is not a matter of luck. It is a matter of knowing exactly what to ask for.
FAQs
What is the difference between a U shape and a V shape cut for mermaid waves?
A U shape creates a gently curved hemline where the center back hangs slightly longer than the sides, giving a soft, rounded finish. A V shape creates a more pointed center back with sharper angles at the sides. For mermaid waves, the U shape is generally preferred because it allows waves to fall more evenly across the back without creating a dramatic focal point at the center. The V shape can work but requires more precise layering to prevent the waves from looking asymmetrical.
How long does a U shape long layers haircut last before you need a trim?
Most stylists recommend refreshing this cut every 10–14 weeks. Because the U shape has no sharp geometric line to maintain, slight grow-out tends to look natural and intentional rather than overgrown. The layers, however, can start to lose definition after 12 weeks as the ends become heavier. A light dusting (removing just 1/4 to 1/2 inch from the ends) every 3 months is usually enough to keep the shape and movement intact without losing length.
Can you get U shape long layers with soft mermaid waves on curly or wavy hair?
Yes — and the results can be spectacular. Here’s how the approach differs for non-straight hair:
- The U shape is cut on dry, natural hair (not stretched or blown out straight).
- Layers are cut slightly shorter to account for shrinkage when curls spring up.
- Mermaid waves are typically enhanced with a diffuser rather than a wand, to work with the natural curl pattern.
- A curl-defining cream replaces the sea salt spray in the prep stage. Naturally wavy hair especially benefits from this cut because the U shape removes the weight that drags waves flat.
What face shapes suit U shape long layers with soft mermaid waves best?
This style is remarkably versatile, but it particularly flatters oval, heart, and round face shapes. The layers that frame the face naturally narrow the perceived width, which benefits round faces significantly. Heart-shaped faces benefit from the volume at the mid-lengths, which balances a wider forehead. Square faces can also wear this look well when the layers are styled to fall forward softly, softening the jawline. Oblong face shapes may want to avoid a very deep U shape, as it can elongate the face further — a shallower curve is more flattering.
How do you maintain U shape long layers with soft mermaid waves between salon visits?
Three habits make a real difference. First, use a wide-tooth comb only (never a brush) on damp layered hair to prevent breakage at the mid-lengths. Second, sleep on a silk or satin pillowcase — cotton creates friction that disrupts waves overnight and causes frizz that builds up over time. Third, apply a weekly deep conditioning treatment to the ends and mid-lengths specifically, since layers tend to be finer than the under-layers and dry out faster. A leave-in conditioner used on wash days will also significantly extend the life and smoothness of your waves.
Is it possible to DIY a U shape cut at home, or should you always go to a salon?
For the initial U shape cut, a professional stylist is strongly recommended — especially if you are also getting layers cut in. The U shape requires precise sectioning and cutting at an angle that is difficult to execute accurately on your own hair. That said, minor maintenance trims (refreshing the curve of the U every few months) can be done at home using the “ponytail method” — pulling all hair into a low ponytail at the nape, cutting straight across, and releasing to reveal the U shape. This works for maintenance but should not replace a proper salon cut for the initial shaping of the layers.